


 10:18 PM
 secure your world

With the rising popularity of telecommuting and the increasing need to protect their electronic assets, companies large and small have been turning to Virtual Private Networking (VPN). The good news is that many savvy IT departments realize that many of their telecommuting employees share their broadband connections with consumer-grade routers. Those folks have made their lives easier by using "NAT friendly" VPN gateways and VPN clients that don't require any changes to home users' router settings in order to successfully set up a VPN tunnel.
With the rising popularity of telecommuting and the increasing need to protect their electronic assets, companies large and small have been turning to Virtual Private Networking (VPN). The good news is that many savvy IT departments realize that many of their telecommuting employees share their broadband connections with consumer-grade routers. Those folks have made their lives easier by using "NAT friendly" VPN gateways and VPN clients that don't require any changes to home users' router settings in order to successfully set up a VPN tunnel.
Just Passing Through
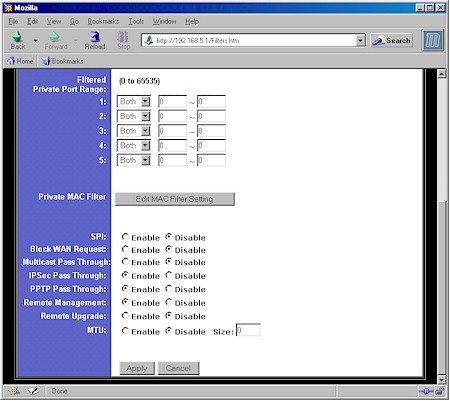
If you're not so lucky, however, you still may be able to get the job done. First thing to check is whether your router has any settings for PPTP or IPsec "pass through". These are commonly found in Linksys routers but you may have to hunt around for them. Figure 1 shows a shot of the bottom of Linksys' BEFSR41 Filters screen, which contains separate enables for PPTP and IPsec pass through.

All you need to do is enable the setting for the VPN protocol that you're using, reboot your router and, if you're lucky, the VPN connection will come right up.
Note: Not all routers have these enables and the lack of them doesn't necessarily mean that you can't get VPN working.
Open up that Firewall
Still no connection? The next step is to try opening some ports in your router's firewall to get your VPN connection made. In each case, you'll need to open the specific ports (and protocol) to the IP address of the computer that you're running the VPN client on. NOTE that port mappings work with only one computer at a time. If you have multiple VPN clients that you need to connect, your router will have to support the VPN protocol that you're using without requiring ports opened.
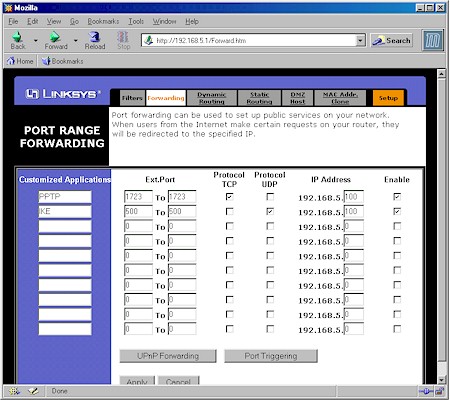
If you're using Microsoft's PPTP protocol, TCP port 1723 is the port you'll need to forward to allow PPTP control traffic to pass. Figure 2 shows the Forwarding screen on a Linksys BEFSR41 set to forward this port to a client with IP address 192.168.5.100.

With the rising popularity of telecommuting and the increasing need to protect their electronic assets, companies large and small have been turning to Virtual Private Networking (VPN). The good news is that many savvy IT departments realize that many of their telecommuting employees share their broadband connections with consumer-grade routers. Those folks have made their lives easier by using "NAT friendly" VPN gateways and VPN clients that don't require any changes to home users' router settings in order to successfully set up a VPN tunnel.
With the rising popularity of telecommuting and the increasing need to protect their electronic assets, companies large and small have been turning to Virtual Private Networking (VPN). The good news is that many savvy IT departments realize that many of their telecommuting employees share their broadband connections with consumer-grade routers. Those folks have made their lives easier by using "NAT friendly" VPN gateways and VPN clients that don't require any changes to home users' router settings in order to successfully set up a VPN tunnel.
Just Passing Through
If you're not so lucky, however, you still may be able to get the job done. First thing to check is whether your router has any settings for PPTP or IPsec "pass through". These are commonly found in Linksys routers but you may have to hunt around for them. Figure 1 shows a shot of the bottom of Linksys' BEFSR41 Filters screen, which contains separate enables for PPTP and IPsec pass through.
Reduced: 45% of original size [ 450 x 401 ] - Click to view full image
All you need to do is enable the setting for the VPN protocol that you're using, reboot your router and, if you're lucky, the VPN connection will come right up.
Note: Not all routers have these enables and the lack of them doesn't necessarily mean that you can't get VPN working.
Open up that Firewall
Still no connection? The next step is to try opening some ports in your router's firewall to get your VPN connection made. In each case, you'll need to open the specific ports (and protocol) to the IP address of the computer that you're running the VPN client on. NOTE that port mappings work with only one computer at a time. If you have multiple VPN clients that you need to connect, your router will have to support the VPN protocol that you're using without requiring ports opened.
If you're using Microsoft's PPTP protocol, TCP port 1723 is the port you'll need to forward to allow PPTP control traffic to pass. Figure 2 shows the Forwarding screen on a Linksys BEFSR41 set to forward this port to a client with IP address 192.168.5.100.
Reduced: 45% of original size [ 450 x 401 ] - Click to view full image
PPTP also needs IP protocol 47 (Generic Routing Encapsulation) for the VPN data traffic itself, but note that this is a required protocol, not a port. The ability to handle this protocol must be built into the router's NAT "engine" - which is true of most present-generation routers.
IPsec-based VPN's need UDP port 500 opened for ISAKMP key negotiations, IP protocol 51 for Authentication Header traffic (not always used), and IP protocol 50 for the "encapsulated data itself. Again, the only "forwardable" item here is UDP port 500, which is also shown programmed in Figure 2 to the same LAN client machine - protocols 50 and 51 must be built into your router.
Still not Working?
Getting many IPsec-based VPN setups working can be a black art due to the wide variation in techniques used by various vendors. Although IPsec products have become more uniform as the technology matures, your company may use older, more proprietary products that may not be configured with NAT in mind, or require additional ports to be opened in your firewall.
r00t Security
VIVA INDONESIA CODER TEAM
Get The Code and Fell The SOUL
With the rising popularity of telecommuting and the increasing need to protect their electronic assets, companies large and small have been turning to Virtual Private Networking (VPN). The good news is that many savvy IT departments realize that many of their telecommuting employees share their broadband connections with consumer-grade routers. Those folks have made their lives easier by using "NAT friendly" VPN gateways and VPN clients that don't require any changes to home users' router settings in order to successfully set up a VPN tunnel.
Just Passing Through
If you're not so lucky, however, you still may be able to get the job done. First thing to check is whether your router has any settings for PPTP or IPsec "pass through". These are commonly found in Linksys routers but you may have to hunt around for them. Figure 1 shows a shot of the bottom of Linksys' BEFSR41 Filters screen, which contains separate enables for PPTP and IPsec pass through.
All you need to do is enable the setting for the VPN protocol that you're using, reboot your router and, if you're lucky, the VPN connection will come right up.
Note: Not all routers have these enables and the lack of them doesn't necessarily mean that you can't get VPN working.
Open up that Firewall
Still no connection? The next step is to try opening some ports in your router's firewall to get your VPN connection made. In each case, you'll need to open the specific ports (and protocol) to the IP address of the computer that you're running the VPN client on. NOTE that port mappings work with only one computer at a time. If you have multiple VPN clients that you need to connect, your router will have to support the VPN protocol that you're using without requiring ports opened.
If you're using Microsoft's PPTP protocol, TCP port 1723 is the port you'll need to forward to allow PPTP control traffic to pass. Figure 2 shows the Forwarding screen on a Linksys BEFSR41 set to forward this port to a client with IP address 192.168.5.100.
With the rising popularity of telecommuting and the increasing need to protect their electronic assets, companies large and small have been turning to Virtual Private Networking (VPN). The good news is that many savvy IT departments realize that many of their telecommuting employees share their broadband connections with consumer-grade routers. Those folks have made their lives easier by using "NAT friendly" VPN gateways and VPN clients that don't require any changes to home users' router settings in order to successfully set up a VPN tunnel.
With the rising popularity of telecommuting and the increasing need to protect their electronic assets, companies large and small have been turning to Virtual Private Networking (VPN). The good news is that many savvy IT departments realize that many of their telecommuting employees share their broadband connections with consumer-grade routers. Those folks have made their lives easier by using "NAT friendly" VPN gateways and VPN clients that don't require any changes to home users' router settings in order to successfully set up a VPN tunnel.
Just Passing Through
If you're not so lucky, however, you still may be able to get the job done. First thing to check is whether your router has any settings for PPTP or IPsec "pass through". These are commonly found in Linksys routers but you may have to hunt around for them. Figure 1 shows a shot of the bottom of Linksys' BEFSR41 Filters screen, which contains separate enables for PPTP and IPsec pass through.
Reduced: 45% of original size [ 450 x 401 ] - Click to view full image
All you need to do is enable the setting for the VPN protocol that you're using, reboot your router and, if you're lucky, the VPN connection will come right up.
Note: Not all routers have these enables and the lack of them doesn't necessarily mean that you can't get VPN working.
Open up that Firewall
Still no connection? The next step is to try opening some ports in your router's firewall to get your VPN connection made. In each case, you'll need to open the specific ports (and protocol) to the IP address of the computer that you're running the VPN client on. NOTE that port mappings work with only one computer at a time. If you have multiple VPN clients that you need to connect, your router will have to support the VPN protocol that you're using without requiring ports opened.
If you're using Microsoft's PPTP protocol, TCP port 1723 is the port you'll need to forward to allow PPTP control traffic to pass. Figure 2 shows the Forwarding screen on a Linksys BEFSR41 set to forward this port to a client with IP address 192.168.5.100.
Reduced: 45% of original size [ 450 x 401 ] - Click to view full image
PPTP also needs IP protocol 47 (Generic Routing Encapsulation) for the VPN data traffic itself, but note that this is a required protocol, not a port. The ability to handle this protocol must be built into the router's NAT "engine" - which is true of most present-generation routers.
IPsec-based VPN's need UDP port 500 opened for ISAKMP key negotiations, IP protocol 51 for Authentication Header traffic (not always used), and IP protocol 50 for the "encapsulated data itself. Again, the only "forwardable" item here is UDP port 500, which is also shown programmed in Figure 2 to the same LAN client machine - protocols 50 and 51 must be built into your router.
Tip: Not all routers are created equal! Some allow only one VPN tunnel to be opened and used by a single client. Others support multiple tunnels, but with one client per tunnel. Unfortunately, most vendors don't make the VPN pass through capabilities of their products clear in their documentation, nor do they have support staff properly trained to provide this information either. In most cases, your only option is to try a router in your specific application, and make sure you can return it and get your money back if you can't get it working.
Still not Working?
Getting many IPsec-based VPN setups working can be a black art due to the wide variation in techniques used by various vendors. Although IPsec products have become more uniform as the technology matures, your company may use older, more proprietary products that may not be configured with NAT in mind, or require additional ports to be opened in your firewall.
r00t Security
VIVA INDONESIA CODER TEAM
Get The Code and Fell The SOUL
 Posted in: Tutorial


